
Hatch Embroidery Software Virtual Private Classes
Would you like to feel more confident using Hatch Embroidery Software and better understand the tools available to you? Join me for private Virtual Hatch Embroidery Software Basics Class, where we will explore the software together in a friendly, easy-to-follow learning environment.
Whether you are new to Hatch or simply want to strengthen your skills, this class is designed to help you better understand the software and use it more comfortably for your embroidery projects. Because the class is virtual, you can participate from home while following along on your own computer.
Register for the Virtual Hatch Embroidery Software Class here:
https://bit.ly/4wKxXY5
What’s been going on at Blue Bunny Hollow?
Hi Everyone!
We have been busy digitizing new designs for you to stitch on your projects. We have about 17 sets to list as soon as the testing is done. Everything from First Birthday and Edge-to-Edge (E2E) quilting designs to Easter and Mom designs… and a few Christmas for those who like to start embroidering early for the holidays.
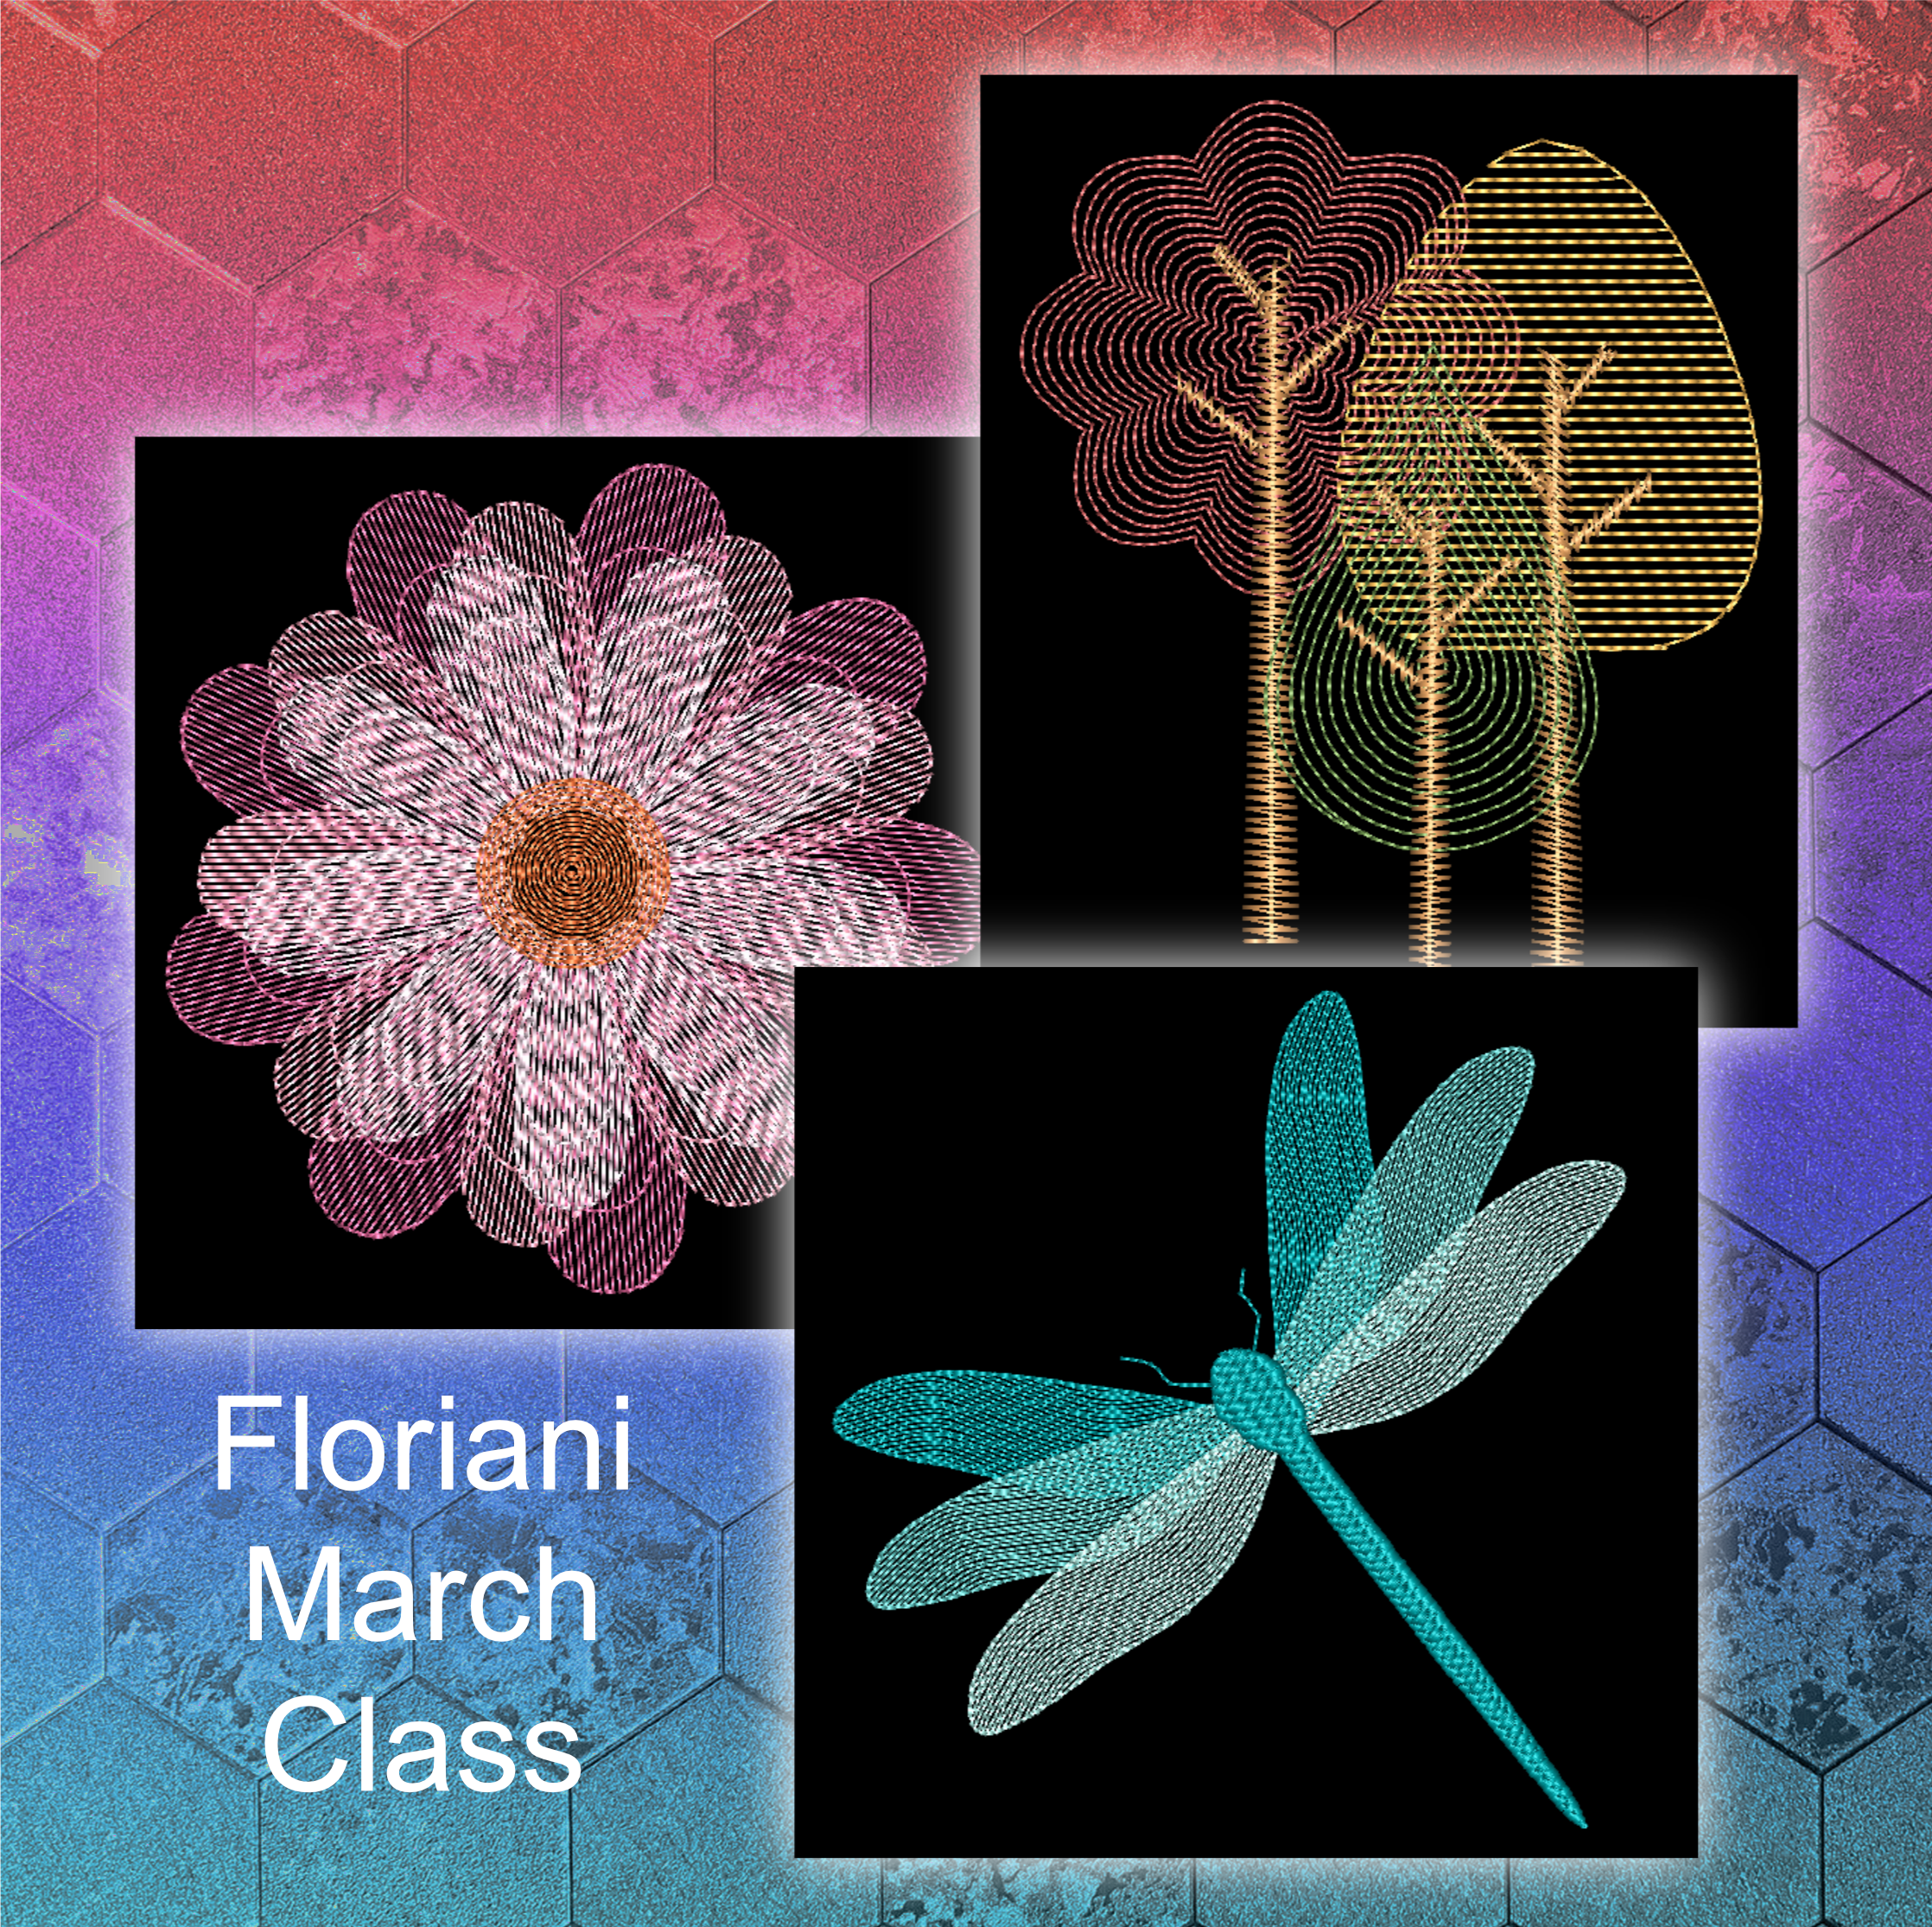
I also teach virtual classes. Embroidery software (Floriani Total Contol U, Brother/Babylock PE-Design/Palette, Bernina 9) and mastering your Brother/Babylock Multi-needle embroidery machines (10 and 6 needle). You can see my classes at https://www.qualitysewing.com/collections/virtual-classes. Pictured below are designs we will be creating in my March Floriani Total Control U Class.
TIP: I was embroidering on a leather bag on my Brother 10-needle. When I removed the bag, the bobbin door stuck to the leather and popped right off with it, now it won’t stay shut. DARN! It has been like that for a bit and was going to have it fixed the next time it was serviced. On a FB group, someone posted this link https://www.youtube.com/watch?v=Dlw1S08Tp1U to fix the bobbin door. Yeah! It now closes perfectly! Much easier than I thought!
Enjoy your sewing adventures!
Lana — Head Fluffle
Jordyn — Fluffle Administrator & Keeper of the Website Magic
The Fluffles (wild bunnies) — professional mischief-makers
Holiday Stitching Starts NOW — Our Biggest Sale of the Year!
It’s officially the best season of the year—holiday magic, family memories, delicious food, and the mad dash to finish all those handmade gifts! Blue Bunny Hollow is here to make your stitching season brighter with our BIGGEST sale of the year.
🔥 Black Friday • Small Business Saturday • Cyber Monday Sale
🗓 November 27th – December 1st
⭐ 25% off featured designs
⭐ 50% off every other design in the shop
No code needed—everything is discounted automatically!
Stock up on fresh embroidery designs for your holiday projects, gifts, and last-minute creations. PLUS: brand-new Christmas designs will be added during the weekend sale, so check back often for new goodies!
https://bluebunnyhollow.com/christmas
Take a peek at some of the newest designs at Blue Bunny Hollow:


Happy Stitching & Merry Christmas,
Lana — Head Fluffle
Jordyn — Fluffle Administrator & Keeper of the Website Magic
The Fluffles (wild bunnies) — professional mischief-makers
Exciting news from Blue Bunny Hollow
✨ Exciting news from Blue Bunny Hollow! ✨
I’m thrilled to introduce Custom Name Digitizing — personalized lettering, manually digitized for beautiful embroidery results on your own projects. Choose from a variety of professionally stitched fonts, with or without knockdown stitching, perfect for towels, bags, and gifts. Each name is custom-created for smooth stitching and a polished finish. Watch this short sneak peek to see the process in action — my machines are busy bringing your ideas to life! 💙
🧵 Order details and font previews are available at https://bluebunnyhollow.com/featured
Thank you for supporting handmade creativity — I can’t wait to digitize something special for you!
Lana, Head Fluffle
Jordyn, Fluffle Administrator, the brains of the website
Fluffles (wild bunnies), usually causing trouble
Back to School Sale
Back to School Sale!! With an enormous 60% off on select categories.
I have added several new alphabets. So the Fluffles (wild bunnies) said we need a great Back to School Sale. So they decided on a 60% off sale. WOW!!!
So, until September 30, 2025. All embroidery designs in the category "Alphabets, Numbers & Calendars" will be on sale. But, what would a Back to School sale be without the "School" category, so that also has 60% off.
https://bluebunnyhollow.com/alphabets-numbers-calendars
https://bluebunnyhollow.com/school
The 60% discount is automatically taken off at checkout. There is no limit to the number of times you can use the discount so you can shop all month long on these 2 categories and receive the 60% discount! Sale ends September 30, 2025.
https://bluebunnyhollow.com/alphabets-numbers-calendars
https://bluebunnyhollow.com/school
Happy Shopping
Lana, Head Fluffle
Jordyn, Fluffle Administrator, the brains of the website
Fluffles (wild bunnies), usually causing trouble


Get a $5 Discount Code!
So, what has been happening at the Hollow? From equipment and software issues, computer crashing, writing tutorials for virtual classes, digitizing and testing new designs, and the ever downsizing of fabric and craft supplies…I have let posting on this blog slide.
So, what has been happening…
The Fluffles (wild bunnies) and I have posted many new designs from alphabets https://bluebunnyhollow.com/alphabets-numbers-calendars to unicorns https://bluebunnyhollow.com/animals/unicorn-10-designs and everything in between. Lucinda continues to post adorable designs in her In the Hoop section at https://bluebunnyhollow.com/in-the-hoop-by-lucinda .
Also, I am working on getting more traffic to this website https://bluebunnyhollow.com/, SEO's (which are so confusing), and all that goes with making this website seen by more creative embroiderers.
So, if you have stitched out a design(s) from Blue Bunny Hollow website, learned something from one of the videos on the website, taken a hands-on or virtual class from me, I would really appreciate if you would go to the following link and post a review, you can also add a picture of your creation!
As a thank you for your time, anyone posting a review will get a $5 discount code towards embroidery designs at Blue Bunny Hollow!
Thank you so much and have a great week!!
Enjoy your sewing adventures!
Lana, Head Fluffle
Jordyn, Fluffle Administrator, the brains of the website
Fluffles (wild bunnies), usually causing trouble
BLACK FRIDAY 50% Off Sale Starts Today!
Hi Everyone!
Have you started your holiday embroideries yet? Yes? No? Trying to figure out what you want to embroider? Well, we are here to help you. Our starts our Black Friday thru Cyber Monday SALE STARTS TODAY!
Start shopping now at Blue Bunny Hollow Embroidery Designs!
November 25 – December 2, 2024
50% off all embroidery designs, in all categories.
Stop by throughout the week for great savings!!
No limit on the number of times you can save.
No code needed, the 50% off discount will automatically apply to your cart!
The Fluffles (wild bunnies), my tech team, and I thank you for shopping with us this holiday season.
Enjoy your sewing adventures!
Lana, Head Fluffle
Jordyn, Fluffle Administrator, the brains of the website
Fluffles (wild bunnies), usually causing trouble
Labor Day 50% Off Sale!
Good Day Embroiderers!!
Prepare for the upcoming holiday embroidery season with a SPECTACULAR 50% OFF all embroidery designs during our Labor Day Sale this weekend at Blue Bunny Hollow Embroidery Designs. Starting today, Thursday, August 29, 2024, ending at midnight September 2, 2024. ADDED NOTE: Due to the popularity of the sale, it has been extended until midnight September 5, (PST)
This sale includes Lucinda’s Embroideries. Lucinda does amazing in-the-hoop designs, check them out!


Explore and check out these other unique designs available from our collection at Blue Bunny Hollow. You might find something that perfectly suits your style or needs.


Stop by and stock up on all your holiday decorating and gift giving embroidery designs.
Enjoy your sewing adventures!
Lana, Head Fluffle
Jordyn, Fluffle Administrator, the brains of the website
Fluffles (wild bunnies), usually causing trouble
Merry Christmas in July!!
Hi Everyone,
Just a quick post to tell you about new embroidery designs, and a free design!!!!
Christmas Mannequins
I have just listed the 2024 Christmas Mannequin design. Snow Girl, the seventh in a beloved series of Christmas Mannequins. And…it is FREE for the entire month for Christmas in July. The Fluffles (wild bunnies), have also put the entire collection of Christmas Mannequins on sale for 50% off, and can be purchased at https://bluebunnyhollow.com/christmas.


In-the-Hoop
If you are an In-the-Hoop fan, check out our featured designer. Lucinda continues to add beautiful In-the-hoop designs to her collection. You can view these at https://bluebunnyhollow.com/in-the-hoop-by-lucinda.
Also check out the 10 new adorable Owls that just landed!! https://bluebunnyhollow.com/animals


Enjoy your sewing adventures!
Lana, Head Fluffle
Jordyn, Fluffle Administrator, and the one that is the brains of the website
Fluffles (wild bunnies), usually causing trouble

Upcoming Virtual Classes!
Hi Everyone!!!
OH MY...it has been almost a year...where has the time gone…well…there is just me (digitizer, embroiderer, and all things to get designs listed, creating and teaching virtual classes), etc., my very techy daughter (does all techy stuff I don’t understand, while taking care of her family, going to school and working full time), and of course the very mischievous Fluffles (wild bunnies) that work here. So the blog has slipped through the cracks. But I do have new items to talk about.
Let me first do a quick commercial for my upcoming virtual classes. I will be teaching classes on Floriani Total Control U embroidery software (basic and Intermediate-advanced) PEDesign/Palette 11 embroidery software (basic and intermediate-advanced), Brother/Babylock 6 and 10 needle usage, and a specialty class on my wood based wood-rope bowls. You can see further information and register for these classes here: Lana Jones at Quality Sewing.


Exciting News: We have added the wonderful In-The-Hoop designs by Lucinda to the website. We are just getting her designs posted so check back often to see what’s new.


Lots of designs have been listed on the website since the last blog post. All new designs are always shown on the Blue Bunny Hollow Facebook page.
Also, I post fun things about sewing and embroidery on Blue Bunny Hollow Facebook Group

Enjoy your sewing adventures!
Lana, Head Fluffle
Jordyn, Fluffle Administrator, and the one that is the brains of the website
Fluffles (wild bunnies), usually causing trouble
Master the Art of Perfect Embroidery Placement
Master the Art of Perfect Embroidery Placement with Our Video Tutorial
Embroidery is a beautiful craft that allows you to personalize and enhance various fabric projects. However, one crucial aspect that can make or break your embroidery design is the placement. Achieving perfect placement is not only visually appealing but also ensures that your design is well-balanced and harmonious. In our video tutorial, we'll guide you through the process step by step, providing valuable tips and techniques to help you master the art of perfect placement embroidery.
Whether you're a beginner or an experienced embroiderer, our video tutorial offers something for everyone. By watching and practicing the techniques we share, you'll enhance your embroidery skills and gain confidence in your ability to create stunning designs. Perfect placement embroidery will become second nature to you, allowing you to elevate your craft to new heights.
Don't let placement mishaps ruin your embroidery projects. Watch our video tutorial on perfect placement embroidery and unlock the secrets to creating visually stunning designs. With our guidance and valuable tips, you'll gain the skills and knowledge needed to master this essential aspect of embroidery placement. Get ready to take your embroidery skills to the next level and create impressive works of art that will leave others in awe. Watch our video now and embark on a journey to perfect placement embroidery mastery.
You can find the video Perfect Placement Embroidery in the video section of this website. https://bluebunnyhollow.com/videos
How to Sew Perfect Corners - New Video!
New video on how to sew perfect corners. If you struggle with corners that aren’t quite right, check out this step by step video. You can find this video at https://bluebunnyhollow.com/videos

I am using the Pfaff 5/8” foot to sew the seam for this video, but any sewing foot that gives you the seam width needed can be used.
Wood Base Rope Bowls
Hi Everyone!
I have been asked by many people to do a class on my wood base rope bowls, seen below. Well...here it is!!! The class has been scheduled on June 12th at 10am. You can sign up for the class HERE!
It will be a virtual lecture/demo class. Wood base techniques that will be shown: painting, stenciling, sublimation, veneer and wood medallions. I will also have an embroidered wood base to share with you. It is not a hands-on class, so you do not need to purchase anything until you decide the type of wood base you want to make, and no pressure to keep up with class...easy and relaxing...just enjoy and learn a new technique.
I will show you step by step how I make my wood bases, and then I will show you how I attach the rope and the beads to the wood base with a sewing machine...Don't worry, we won't be stitching through the wood base.
Can't make it on that day? Sign up for class, and a recording will be sent to you after the completion of the class.


Happy Spring...
Hi Everyone!
Wow…The Fluffles (wild bunnies) and I have been so very busy digitizing and posting new designs that we have not taken the time to post anything on our blog or send out an email since Christmas. But we have created some wonderful designs for your embroidery projects, Christian Quotes https://bluebunnyhollow.com/faith, Mother’s Day https://bluebunnyhollow.com/people, Fish https://bluebunnyhollow.com/animals, Wine https://bluebunnyhollow.com/food-and-drink designs and so much more.
All Blue Bunny Hollow designs are hand digitized by me, Lana L Jones. I do not use the auto-digitizing process in my software on any of my designs. Also, all the lettering is hand digitized by me, per the artwork I purchase. I do not use lettering available in my software, nor pre-done lettering that can be bought on the internet. I just totally enjoy digitizing by hand all of my designs. I feel that gives you a much better design that embroiders beautifully.


Very excited to announce that I have also started digitizing designs for hats. These are digitized differently than standard designs as they need a tighter density and are digitized from the bottom up and center out. This helps the hat embroidery to stitch out with optimum results. Check the hats out at https://bluebunnyhollow.com/sports-fitness-hats. Here are a few samples. Mother’s Day and Father’s day will be here soon. They would look great with a hat that you embroidered just for them!


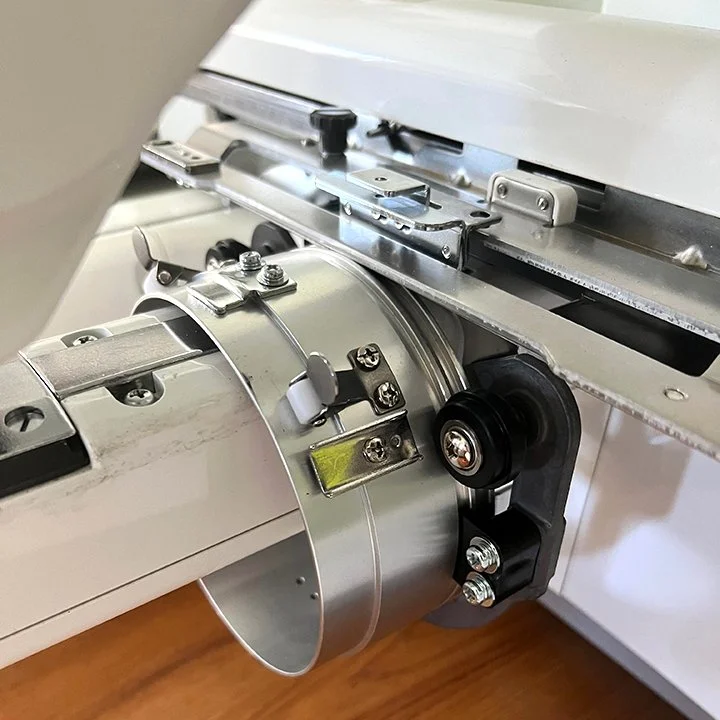
Do you own an older Brother or Babylock multi-needle embroidery machine (horizontal screen, as show in the pictures below)? You may have been told that the new Flat Brim Hat Hoop will not work on your machine. Well…I stitched the hats shown above with a Brother PR600/II and the new Flat Brim Hat Hoop and had no problems…I did not do an update on the machine to accept the new hat hoop, as there isn’t one, and I did not make any adjustments to my machine. The best part!!! Using the new Flat Brim Hat Hoop gets the design really close to the brim, 3/8”-1/2”, without using an override bracket, if you know what that is. I was super excited when I tried it on my machine and it worked perfectly!


Also check out some of the new rescue dog and cat designs, which, by the way, stitch beautifully on Doggie and Kitty Dining Mats available at (Note: products have been discontinued temporarily 081725). Rescue Dog and Rescue Cat designs are available at https://bluebunnyhollow.com/animals.


Coming soon are large button designs that would be perfect for finishing the rope bowls that are so popular right now, and Mylar (wings) Dragonfly designs.


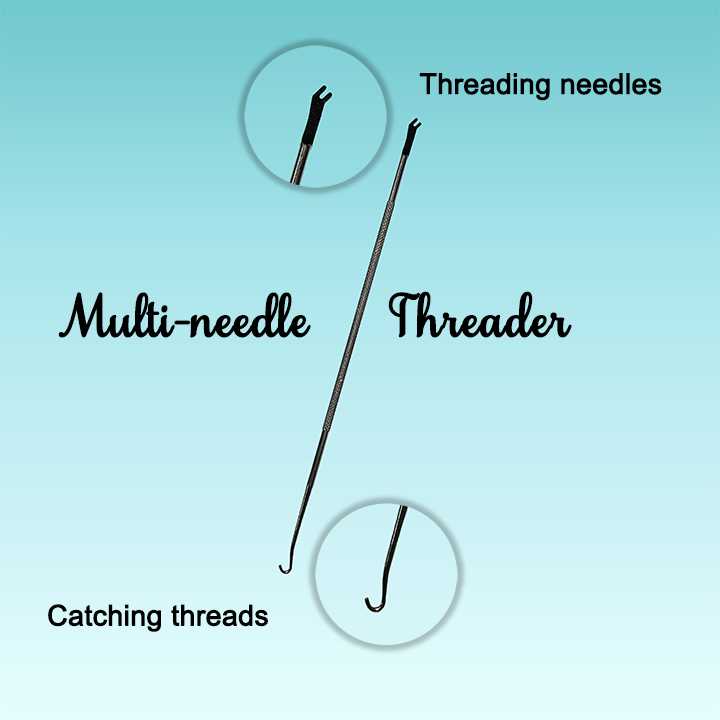
If you have a multi-needle machine and would like a great threader, check out Blue Bunny Hollow’s Multi-needle threader. I love the long handle to reach the upper thread guide, and the hook at the end makes it great to grab the thread from the needle. Available at (Note: products have been discontinued temporarily 081725)
I post all discounts and sale items on my Facebook Page https://www.facebook.com/BlueBunnyHollow. If you have not been there, hop on over and click Like and Follow to get the most current happenings.
I also have a Facebook Group called Embroidabellishment. I post ideas, video tutorials, things I have made, etc. to inspire, and show how I make my projects. You can join this group at https://www.facebook.com/groups/447645707260587 .
Enjoy your sewing adventures!
Lana, Head Fluffle
Jordyn, Fluffle Administrator, and the one that is the brains of the website
Fluffles (wild bunnies), usually causing trouble

https://www.creativefabrica.com/product/bride-122/ref/155117/
Merry Christmas!
Merry Christmas! Hope all is well with you and your family.
Christmas has certainly come quickly this year. It seems October and November were only a week long each. And here we are just a couple of weeks away from Christmas. Are you ready? I am not…hope to be soon. Well onto things you might want to know…

First: 40% off with discount code...but you will have to work for it.
There are 3 ornaments (shown below) hidden somewhere in https://bluebunnyhollow.com/ You just need to find one of them to get the discount code. Once found, use the code at checkout to receive 40% off embroidery designs, singles or sets, on the website. NOTE: The discount applies to all embroidery designs on the website, not just the ones marked with the ornament.
The code can only be used once per person, so make sure you have all you want in your cart before check out. Discount code good through December 25, 2022.
Second: There are lots of new designs listed since my last post. Be sure to look around to see what is new. There are new blanks to embroider, Christmas designs and much more.
Third: Make sure you download the 2022 Christmas Mannequin. She is free until the end of the year.

Fourth: I post all discounts and sale items on my Facebook Page https://www.facebook.com/BlueBunnyHollow. So, if you have not been there, hop on over and click Like and Follow to get the most current happenings.
Fifth: I have started a Facebook Group called Embroidabellishment. I post ideas, video tutorials, things I have made, etc. to inspire, and show how I make my projects. You can join that group at https://www.facebook.com/groups/447645707260587 .
The Fluffles, Fluffle Administrator, and I wish you a very Merry Christmas!
Enjoy your sewing adventures!
Lana, Head Fluffle
Jordyn, Fluffle Administrator, and the one that is the brains of the website
Fluffles (wild bunnies), usually causing trouble
Time has flown by...
Since my last post I have retired from Quality Sewing as an Educational Consultant. I am now working on this website and just doing Lana things…that keeps me quite busy in my studio.
I have started a new Facebook Group. Embroidabellisment. There I will be posting fun ideas, tips, techniques for sewing and embroidery. My Facebook page https://www.facebook.com/BlueBunnyHollow is where I post all my newest embroidery designs. So hop on over and join the fun.
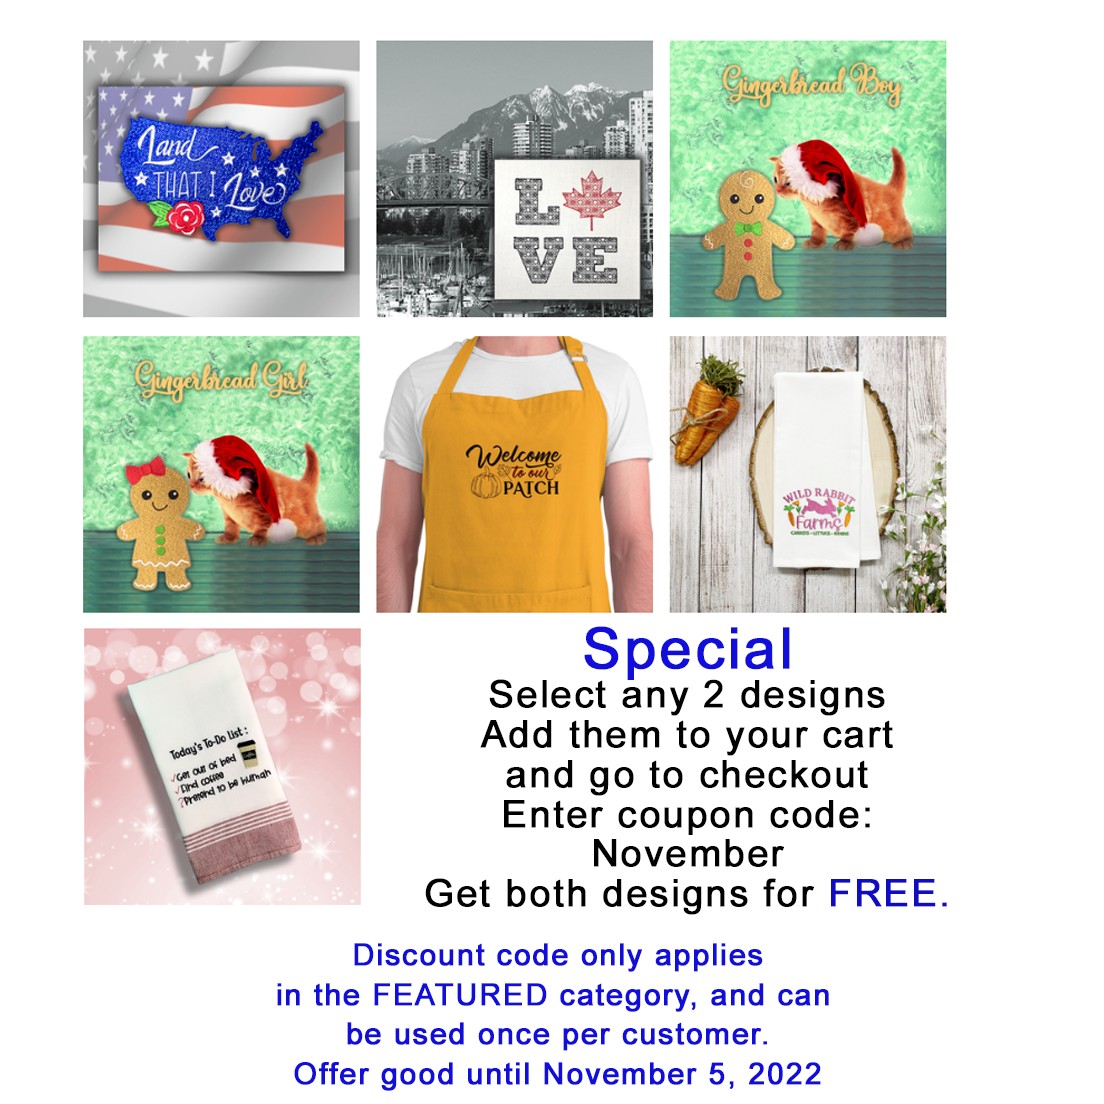
The Fluffles (wild bunnies) decided to have a sale on this website. So they gathered together 7 embroidery designs for the sale...wait a minute...The Fluffles went overboard and are giving you a coupon code to get any 2 Featured designs...for FREE...well that is quite a sale!
So hop on over to the FEATURED category and select any 2 designs for FREE and enter coupon code November. Offer good until November 5, 2022. https://bluebunnyhollow.com/featured
As always, we appreciate your business and enjoy looking around at all the great embroidery designs.
Enjoy your sewing adventures!
Lana, Head Fluffle
Jordyn, Fluffle Administrator, and the one that is the brains of the website
Fluffles (wild bunnies), usually causing trouble
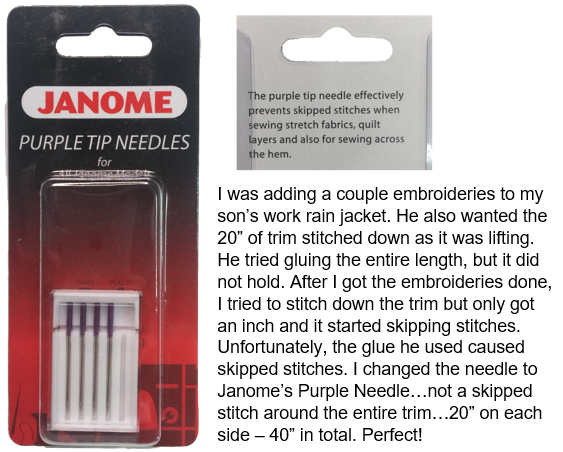
A tip from the Hollow...
NOTE: This purple tip needle from Janome will work in any sewing machine as it has a standard flatback shank.
Wow...time certainly flies...
It is has been a while since I have done a blog post on what is going in the land of Blue Bunny Hollow. Actually, I have simply been working on classes, designs, presentations and normal Lana stuff.

I have gotten in some new fabric, in pink, for my “Ready to Embroider Bags”, colors already available are white, black, and purple. These are at (Note: products have been discontinued temporarily 081725). They only need the side seam sewn and if you want to you can square the bottom. Quick and easy whether you sew or not.
Design on tote bag is from “Home Baked Christmas” This is is at https://bluebunnyhollow.com/christmas
I teach virtual embroidery software classes and available in August are the following classes:
PEDesign and Palette 11 Virtual Zoom Classes: 8/2: 10a-12p (Monday)
Pfaff/Viking Premier 2 Virtual Zoom Classes: 8/2: 2p-4p (Monday)
Floriani Total Control U Virtual Zoom Classes: 8/16: 10a-12p (Monday)
Embellish Maker Virtual Zoom Classes: 8/16: 2p-4p (Monday)
If you have been wanting to learn your software, now is a great time. If you cannot make the scheduled time, but still want to attend class, don’t worry. If you sign up for a class, you will be sent the video recording of the class, which will be available for you to view and review for 2 weeks. You will also be sent a tutorial for the class with step-by-step instructions, illustrations and all icons used in each step. All classes still have available space.
The virtual class sign up can be found at www.qualitysewing.com/instructor/lana-jones/
I have also listed quite a few new designs and design sets on my website https://bluebunnyhollow.com/. So, if you are looking for new, fresh designs, here is a small sampling of the latest singles and sets available.

The Inspirational set is the best deal. 16 designs would be $32 if sold individually. As a set they are $15.99. But, the Fluffles (wild bunnies) loved these so much they decided they wanted to give everyone a good deal. So they are on SALE for a limited time, for 50% off…just $7.99.

If you go to my Facebook Page https://www.facebook.com/BlueBunnyHollow/ you will see the posts of new designs since July 1, 2021.
Enjoy your sewing adventures!
Lana, Head Fluffle
Jordyn, Fluffle Administrator, and the one that is the brains of the website
Fluffles (wild bunnies), usually causing trouble
Redfin article we were featured in...
Showcase Embroidery in Your Home: 23 Unique Embroidery Ideas to Elevate Your Space
The appearance of needlework in home decor is a definite sign that embroidery is making a comeback. While it’s often thought of as a pastime reserved for your grandparents, we’re here to tell you that needlepoint is enjoying its resurgence as a newfound hobby and collector’s item. With a needle, thread, and a little creativity, embroidery can quickly transform your space and allow your personality and imagination to shine through.
If you’re ready to get crafty and want some ideas to add a homey touch to your loft in New York, or decor inspiration for your cozy home in Toronto, On, we’ve got you covered. Redfin reached out to us and other embroidery experts to get our unique embroidery idea to reinvigorate your space. So bust out your embroidery hoops and colorful threads to add some flair to your home.
Showcase Embroidery in Your Home: 23 Unique Embroidery Ideas to Elevate Your Space
Enjoy your sewing adventures…
Spring is here!!!
Hi Everyone!!
Spring is here!!! Open the windows and let the fresh air in! Well…maybe when it stops raining…Washington weather is slightly still wet!
I will be starting virtual software classes for Floriani Total Control U, Premier, PEDesign 11 and Embellish Maker. These will be basic/beginning classes and will help you get started learning the software. All but Embellish Maker are scheduled at https://www.qualitysewing.com/instructor/lana-jones/. Embellish Maker will be after the Floriani class.
I have also listed some new designs. Blue Fluffles in the Garden. Fluffles are wild bunnies and what is wilder than blue bunnies! These are hopping around at https://bluebunnyhollow.com/animals.


Also new to Blue Bunny Hollow is the Coffee and the Moon. A gorgeous design for your projects. This design is at https://bluebunnyhollow.com/nature-and-seasons. The design is embroidered with Kingstar Silver Metallic thread on a tote bag I made out of marine vinyl for April 2021 Sew Fun.

Speaking of Sew Fun…as stated I will be doing the virtual April 2021 Sew Fun. The date has not been decided yet, but when it is, you will see that on the schedule at https://www.qualitysewing.com/april-sew-fun.html.
Those of you not familiar with Sew Fun, it is a lecture demo presentation we have been doing in-person for many years at Quality Sewing and Vacuum at all our locations in the Seattle area. I have personally been doing these presentations for 26 years. Because of not being able to do those at this time, we are doing each month’s presentation virtually. If you ever miss a presentation you can find the replays on Quality Sewing’s Facebook page https://www.facebook.com/qualitysewing. Or, the older ones on the YouTube channel https://www.youtube.com/results?search_query=quality+sewing+and+vacuum.
Tip from the Hollow…
We all know to clean the sole plate of an iron, but have you cleaned the inside? Is your iron spitting out dirty water? Then you probably need to clean the water reservoir.
Pour out any water that is in the iron. Turn on the iron to the maximum heat, and also turn on the steam to the highest level and let the iron heat up for a few minutes. While the iron is heating up, mix ½ cup of water with a ½ cup of white vinegar. Pour this mixture into the iron’s reservoir and let is set for about 5 minutes. If your iron is spitting out lots of dirty water, you can mix ¼ cup water with ¾ cup white vinegar.
Hold the iron just above a towel and push the steam button for about 20-30 seconds so the mixture is pushed through the holes in the sole plate. Repeat this process about 6 times. You will see dirty water on your towel. If after the 6th time the water is still dirty, hold down the steam button a few more times. Once the water that comes out of the iron is clean turn off the iron and let it cool. Then pour out any remaining water/vinegar mixture.
Fill the reservoir about half full with clean water and repeat the process to remove any vinegar that may be remaining. Pour out any remaining water. Fill your very clean iron with fresh water and you will have great steam with no spotting! Yeah!!
Enjoy your sewing adventures!
Lana, Head Fluffle
Jordyn, Fluffle Administrator, and the one that is the brains of the website
Fluffles (wild bunnies), usually causing trouble